Facebook Instagram Twitter Pinterest Bloglovin'
  • Home
  • Gift Guides
    • For You
    • For Your Girlfriends
    • For Men
  • About
  • Contact

The Monogrammed Life


Why spend big bucks on a flower crown when you can DIY? Here are 5 easy steps to get you ready for a summer full of flower crowns! In honor of Memorial Day, we're repping our American pride with our red, white and blue...

What you'll need to get started:
ribbon (thicky and shimmery/slightly transparent)
flowers
scissors
hot glue gun
hot glue sticks
measuring tape (optional)

Step 1: Measure length of ribbon around your head
Using your ribbon (or tape measure), loosely measure one time around your forehead. Cut your ribbon to match this measurement, adding an extra inch. Take the two ends of the ribbon and tie it in a tight bow or knot. If needed, wrap the ribbon around your head to double check where your bow/knot should start. It never hurts to double check!

Step 2: Trim flowers
Next, start cutting off the stems of your flowers. Leave enough stem left that you can still pinch the stem and hold up the lower. Throw away the excess stems.

Step 3: Hot glue flowers to the outside of your ribbon
Starting at the ribbon knot, begin hot gluing your flowers to the outside part of your ribbon. Put the hot glue directly on the flower stem, instead of the ribbon to keep the ribbon looking pretty. There is no right or wrong way to arrange your flowers, so pick and style and go for it!


Step 4: Hot glue flowers to the inside of your ribbon
Once you have glued flowers all the way around the outside of the ribbon, begin hot gluing the rest on the inside. Gluing flowers on both sides of the ribbon will make your crown more full!


Step 5: Let the glue cool down and flowers set
Let the glue cool and harden (approximately 10 minutes to be safe). Once your flowers are safe and secure, you're ready to style your new flower crown!


Make your #OOTD extra fun, festive, and vibrant with a flower crown! Wear it with straight hair, a messy bun, a loose braid or summer beach waves! 


Where do you plan to wear your flower crown? I know I'll be wearing mine today in honor of Memorial Day! For more red, white and blue, shop Marleylilly.com to catch the Memorial Day sale. Preview down below! Xo!


Monday, May 28, 2018 No comments


Themed place settings add extra flair to any occasion - family events, social gatherings with friends, parties with your work pals and especially holiday get-togethers! Make your Easter holiday extra special this year with this adorable DIY craft. It's simple, personalized and memorable for years to come! Chances are, there will probably be eggs somewhere in the mix of the holiday, so grab a few, dyed or not, and get to crafting! 

1) Set aside one boiled egg for every guest you're expecting. Already dyed your Easter eggs? Perfect! Grab those!

2) Using a marker or paint, print your desired initial(s) on each egg. Craft hack - Wite Out will also work!

3) Decorate your egg with cute polka dots or flourishes depending on your desired color scheme and style (gold metallic paint used in pics). You can also use glue and glitter!

4) Set aside to dry

5) To create a whole vignette, place your decorated egg on a serving dish or in glass drinkware. Cushion your eggs with a pinch of moss, paper nest, tissue paper, confetti or the like. 

Simple as that! These adorable place settings are so fun and will bring a thoughtful touch to your Easter holiday. Have fun putting your own twist on your monogrammed egg place settings! If you give it a go, we would love to see your pics!

Wishing you a very happy Easter from all of us here at Marleylilly!

Friday, March 30, 2018 No comments

When I first opened the online boutique I ran from 2012 to 2017, I sold framed vintage silk scarves that I’d found on eBay and Etsy. I learned the hard way that they were exorbitantly expensive to ship and prone to breakage in transit, but I still love their graphic appeal all these years later. Now I’d recommend purchasing a silk scarf (or using one you already own) and having Framebridge take care of the rest, but you could also try one of these acrylic frame kits if you prefer a borderless look.


one (under $50) //two (cotton but only $5!) // three //  four (more vintage Hermès scarves here) // five
six  //  seven ($7!)  //  eight (cotton but only $5!) //  nine (under $60)

Here are a few inspo images if you’re considering one for your space!


images one  //  two  //  three  //  four  //  five

Original content written by Design Darling
Monday, March 12, 2018 No comments

Valentines Day Printables!


Can you believe it's February?! I swear it was December just 2 seconds ago.

I typically like February because it's so short and usually goes by super fast! And then the first full week of March is my spring break and a few friends and I are going on a 4 day cruise and spending the rest of break at my boyfriend Emory's house in Palm Beach! I don't wanna wish February away, but I'm definitely looking forward to March!

I do love February for the pure reason of all the pink! Pink everything please! I sound like Eloise saying that. When I was in elementary school I think Valentine's Day was my favorite day of the year. I would hop out of bed, layer on every pink piece of clothing I owned, and I always added a bedazzled heart stickers from Old Navy on my cheek. Ahhh to be 10 again.

With Valentine's Day right around the corner, I thought it would be fun to share a little V-Day printable you can turn into a cute gift to give to your friends! As great as significant others are, it's always fun to give your best friends a little surprise gift and tell them how much you love and appreciate them!


All you have to do is go to the drug store and buy a cute red or pink nail polish color, print out these cute labels, and use a little ribbon to attach the label to the nail polish! Such a cute and festive little Valentine gift to give to your best friends and not to mention, so easy.

Link to Print!

Insta message (@prepavenue) or snapchat (shannon.hessen) me a picture of how they turned out if you use them! 

Can't wait to see them! Happy February!

Remember,

xoxo

S


Written by Shannon Hessen from Prep Avenue

http://www.prepavenue.com/2017/02/valentines-day-printables.html
Wednesday, January 31, 2018 1 comments

Happy Thursday! If you haven’t already gathered, Christmastime is one of my favorite times of the year (preceded only by Halloween, and followed closely by my birthday). I already have all my shopping DONE for this year and now I am in the midst of wrapping everything for a fabulous Christmas morning. Gift giving (and receiving) is my top love language so this time of year it is especially important to me that I choose the exact right presents for everyone on my life and then wrap them to perfection. SO. Let’s dive into wrapping gifts 101, shall we? 

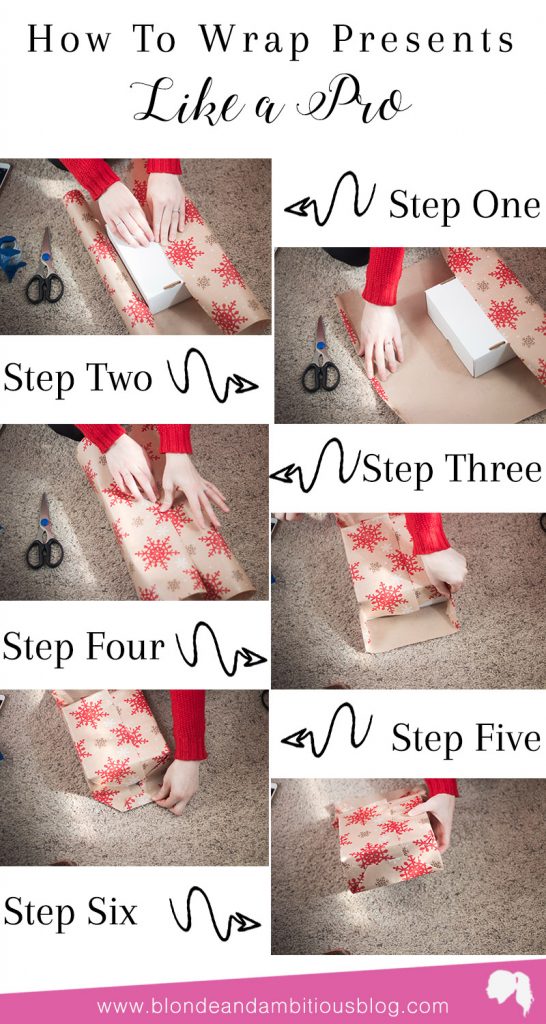
How To Wrap Christmas Presents Like A Pro

Now, I may be proficient at wrapping gifts but it’s nothing compared to my father. He is a wrapping genius. Growing up we always had impeccably wrapped gifts under the tree and it’s not wonder. He’s an artist and perfectionist. Needless to say, however, since getting married and officially being in charge of wrapping my husband’s + extended family’s gifties, I needed to get much better at wrapping. Here is the easiest way to wrap your presents and look like a pro while doing it.
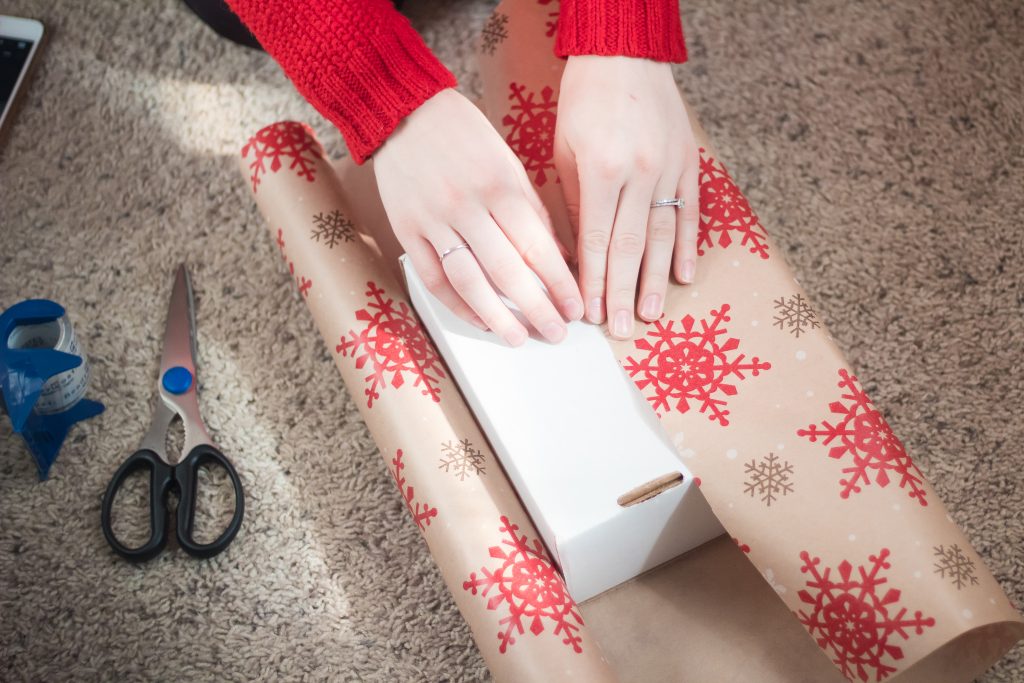
You will need: wrapping paper of your choice, scissors (sharp ones) and clear tape. I chose packing tape simply because it was the only clear tape I had on hand. You may choose clear or satin scotch tape if you so prefer. You want it to disappear into your paper. 
Step 1: Tape down side A to your box.
How To Wrap Christmas Presents Like A Pro
Choose the BACK side of your box to put facing upwards for this step and tape the first side (side A) directly to the box. This will ensure there is NO slippage of the box while you are trying to get clean lines. 
Step 2: Fold side B a quarter inch.
How To Wrap Christmas Presents Like A Pro
This step is optional, but will make your present look professionally wrapped! It creates a sharp, straight line on the box instead of the haphazardly and/or decidedly NOT STRAIGHT side you most likely have from cutting the paper from the roll.
Step 3: Tape down side B over top of side A.
How To Wrap Christmas Presents Like A Pro
You want to make sure you have enough paper for size be to adequately cover side A. This is to make sure you can’t see the box and/or the non-folded side of paper. Use 3 pieces of tape: one in the center, one towards to top and one towards the bottom. Taping this down correctly ensures you don’t have any paper stick up or make folding difficult down the line.
Step 4: Adjust the length of end paper.
How To Wrap Christmas Presents Like A Pro
This part may not be necessary depending on how to portioned your paper out. I over estimated the ending length, so I cut off the extra bit of paper to leave only what I needed to fold. If you left the perfect amount, you are a wrapping goddess and you probably don’t need this tutorial anyways. ðŸ˜‰ 
Step 5: Fold down to top portion of paper.
How To Wrap Christmas Presents Like A Pro
Tape this to the box if necessary to hold it in place for you.
Step 6: Make sharp corners.
How To Wrap Christmas Presents Like A Pro
When you fold down the top portion of paper, you automatically get little paper triangles on the side of your paper. Sharply crease the fold, and then fold into the box on both sides. You will be left with one large triangle on the bottom portion of the paper.
Step 7: Make a small fold on the large triangle and tape.
How To Wrap Christmas Presents Like A Pro
Make a small fold on the large triangle to get rid of “edge” paper like we did in step 3, and then fold onto the box. Be sure to pull tightly to create a shape and crisp fold.
Step 8: Repeat steps 5-7 on opposite side of box.
How To Wrap Christmas Presents Like A Pro
You will do the exact same thing we just did on the opposite side of the box. Remember to pull tightly, and really work on those sharp creases. 
Step 9: Finish up!
How To Wrap Christmas Presents Like A Pro
Put on a box, name tag or ribbon to finish your gifts off and place those pretty suckers underneath that beautiful Christmas tree!
PIN THIS FOR LATER:
How To Wrap Christmas Presents Like A Pro

I hope this helps you wrap your presents faster, easier and more beautifully! I love when I give people gifts and they compliment the wrapping. They just look so stunning under the tree!
Let me know what you thought in the comments below!
Written by Taylor for Blonde and Ambitious
Monday, December 11, 2017 4 comments
we've made a lot of progress in our home since we moved in last june, but I haven't quite gotten to some of the little details yet - like these sweet hangers for our guest room {and built-in wine storage, laundry room upgrade, painting the master... but hey, who's counting?!}. I have always wanted to make these hangers, since I saw them on driven by decor via pinterest, I think. luckily, we have company staying with us this weekend and I'm happy to have had a reason to finally make these  adorable hangers!

my biggest learning from this project was how awesome rub-on letters are. I hadn't heard of them before and couldn't find them at michael's - so I was tempted to buy letter stickers. I made another stop at hobby lobby and finally found a very slim selection of rub-on letters. there were only 3 sheets left, so I bought them all and am so glad I did. these rub-on letters go on so smoothly, they look as if they were printed on the wood. I'll be honest, rubbing the letters on the wood was a cathartic experience and I basically want to rub letters on everything now.


a word to the wise - just be careful when rubbing the letters off, be gentle. I didn't have too many issues, but when I googled rub-on letters - I read a hilarious comment that said something like, "one wrong move and you end up with shabby chic." this is kind of true, once a letter gets ripped during the rub, it's game over. they scratch right off the hangers though, so it's not too big of an issue if it does happen.


I am constantly trying to think of ways to improve our guest room, I always think of it as my little single room B&B. in another life, I will for sure own a B&B in wine country or the mountains. do you do anything special in your guest room or have you ever stayed with someone who made you feel like a special guest?

what you need:
wooden hangers
rub-on letters (not stickers)
ribbon to tie on hook, optional


Written by lauren from lauren alford design
Wednesday, April 05, 2017 5 comments


12:00 AM
I know I'm not the only girl who sees something plain and is tempted to stick her monogram on it just to claim it as mine! After I got my license I would drive my parents crazy because I was constantly asking to borrow one of their cars to go see friends. Shortly after my dad went on a deployment and his car was all mine (for the time being at least)! I ordered a pink vinyl monogram and stuck it on the back window hoping he wouldn't care too much ;) Luckily when he got back my parents officially handed that car over to me (partially because my dad refused to drive a car with a pink monogram on the back) and it still has the pink monogram on the back of it today!

 Monograms are such a classic look that most likely are never going to go out of style. Before I became familiar with photoshop I was determined to make everything using PowerPoint. I quickly discovered little tricks that help you make almost everything you can make on Photoshop using PowerPoint. Although I switched over to using Photoshop for almost everything now, I realize that most people don't have that program so I wanted to make a tutorial about how you can make your own customized monogram using a program that's available to most people.

I have provided step by step instructions on how to make both a script and circle monogram. These are perfect if you want to add them to business cards you're making, resumes, blogs, binder covers, or anything you wish to really! Comment if you have any questions and I will try my best to answer all of them.

I also took screenshots to try to help you through the process. I have a mac so it may be a little different for you if you are working on a pc. 


I love the script monogram look. It's so classic and in my mind it can be added to most anything and look tasteful. This monogram is pretty simple to make in PowerPoint and then you can add it to any fun projects you're making or print it out to hang on your bulletin board! 

1. Download this font

I could honestly spend hours on free font sites like this one. I get so overwhelmed by all the beautiful fonts that I end up downloading a million just for fun! Press the Download button in the right-hand corner (circled below). 


2. Continue to Download

Once you press the download button it will either be downloaded to the little downloads bar at the bottom of your browser (if you're using Chrome) or to your downloads folder. Click on the file you have just downloaded to open it up.  


3. Open the downloaded font

Once you have opened the file it should bring you to the font's folder that you just downloaded. In the folder will be the license and the font file. Click on the font file to install, the .tff file! 


4. Install Font

Once you have pressed on the font file, a window similar to this should pop up and you just need to click "Install Font"!


The font book should open up and show your downloaded font in your font book! Feel free to close this window. Your font is now successfully downloaded!


5. Switch to PowerPoint

Start with a blank slide template and put your three initials in 3 different text boxes. Remember to make your first and middle initial lowercase and then your last name, which will go in the middle, uppercase. For reference, mine were in font size: 287. 

Traditionally the order of a monogram goes first, last, middle. So for example, my name is Shannon Patricia Hessen. But my monogram is: sHp (with my last name in the middle).  


6. Change the font & the color (if you want to!)

Now highlight the letters one by one (or all at once) and change the font to the font you just downloaded, "Monogram kk sc." If for some reason it doesn't show up in your font selection on powerpoint, type in the name ("Monogram kk sc") and it should work. You can also change the color to whatever you chose to!


7. Move close together to make a monogram

Move the two outside initials inside to overlap with the middle letter. Typically in a script monogram the outside letters overlap significantly with the middle letter. 


8. Chose what you're going to use it for, and save it!

If you're going to paste it on top of something else (like a picture or background of some sort) you will want to save just the monogram with a transparent background. To do this, draw a box around the 3 textboxes with your mouse until all of the boxes are selected. Or click on one, hold down shift, and select the other two. Once you have all the text boxes selected, right-click on the picture, and press "Save as Picture." Select where on your computer you want it saved and it will save as a picture with a transparent background! 


If you want to make a circle or box behind your monogram to put on a document, you will first need to draw the shape you want using the shape tool on powerpoint and place that shape behind the monogram. In this example I placed a navy circle behind my monogram. 


Once you have the shape you want, highlight all the objects (3 textboxes + your shape). You can do this by drawing a box around the 4 objects with your mouse until all of the boxes are selected. Or click on one, hold down shift, and select the other three things. Once all are selected right click over your selected objects and press "Save as Picture." Save your picture to your computer and it's ready to be put on anything you want!


Final results:

                      Without Background                    With Circle Background                       


I love the look of the circle monogram! It's a little more modern and clean than the script version. This tutorial is a bit harder but don't worry because I'm going to walk you step by step through it all! 

1. Download this font

If you read through the script monogram steps, the process of downloading the font is going to be the exact same. First, you are going to press the download button in the right-hand corner to start the process of downloading the font. 


2. Continue to download the font

Once you press the download button it will either be downloaded to the little downloads bar at the bottom of your browser (if you're using Chrome) or to your downloads folder. Click on the file you have just downloaded to open it up.  


3. Open the downloaded font + press install 

 Click on the font file, it should be in a .tff file! Click install. Once you click install, it should open up to your font book. You can close out of that when you're done!


4. Open up PowerPoint

Start with a blank slide template and put your three initials in 3 different text boxes. For this fond you will need to make all your letters lowercase. For reference, mine were in font size: 287. 

Traditionally the order of a monogram goes first, last, middle. So for example, my name is Shannon Patricia Hessen. But my monogram is: sHp (with my last name in the middle).


6. Change the font & the color (if you want to!)

Now highlight the letters one by one (or all at once) and change the font to the font you just downloaded, "MONOGRAMOS." If for some reason it doesn't show up in your font selection on powerpoint, type in the name ("MONOGRAMOS") and it should work. You can also change the color to whatever you chose to!


7. Save each text box as a picture 

This is where it gets a bit complicated! Now you will need to select each text box individually, right click, press "Save as Picture," and then save each textbox to a folder you can easily locate. Do this for every text box (so three total).


8. Clear your textboxes & Insert Photos

Once you have saved each text box as it's own individual picture you can delete each of the text boxes (so now your slide should be blank again). 


Now go to "Insert" in the top tool bar, "Photo," and then "Photo from File." Now you're going to insert the 3 photos you just saved back onto your slide.


9. Crop Photos

Now you are going to individually crop each photo so it will be ready to make into a monogram! Double click on each picture and press crop in the toolbar (circled below). Crop out the last two letters in your first initial, crop the first and third letter our of your middle initial, and lastly crop out the first two letters in your last initial. 


10. Move pictures together to make Monogram

Your letters should now look something like this. Cropped so each photo only has one letter. 


Move each letter together to form the circle monogram.


11. Chose what you're going to use it for, and save it!

If you're going to paste it on top of something else (like a picture or background of some sort) you will want to save just the monogram with a transparent background. To do this, draw a box around the 3 textboxes with your mouse until all of the boxes are selected. Or click on one, hold down shift, and select the other two. Once you have all the text boxes selected, right-click on the picture, and press "Save as Picture." Select where on your computer you want it saved and it will save as a picture with a transparent background! 


If you want to make a circle or box behind your monogram to put on a document, you will first need to draw the shape you want using the shape tool on powerpoint and place that shape behind the monogram. In this example I placed a navy circle behind my monogram. 


Final Results:

                  With Background:                            Without Background:                  
Yay!! Hopefully it worked for you! If you have any questions at all feel free to comment and I will try to answer everything! 

Now go monogram everything!

Remember,

xoxo

S

Written by Shannon from Prep Avenue

Wednesday, February 22, 2017 21 comments
Older Posts

The Monogrammed Life

About Me

Welcome to The Monogrammed Life, a fashion and lifestyle blog owned by Marleylilly - Monogrammed Gifts! Thanks for stopping by! We hope you'll stick around and find some inspiration here. Peace, love, and monograms!

Follow Us

Blog Archive

  • ▼  2019 (7)
    • ▼  May (1)
      • 10 Monogrammed Items You Need For Sunny Days Ahead
    • ►  February (1)
    • ►  January (5)
  • ►  2018 (85)
    • ►  August (1)
    • ►  July (3)
    • ►  June (18)
    • ►  May (18)
    • ►  April (13)
    • ►  March (14)
    • ►  February (14)
    • ►  January (4)
  • ►  2017 (120)
    • ►  December (6)
    • ►  November (12)
    • ►  October (13)
    • ►  September (12)
    • ►  August (12)
    • ►  July (12)
    • ►  June (11)
    • ►  May (7)
    • ►  April (12)
    • ►  March (14)
    • ►  February (7)
    • ►  January (2)
  • ►  2016 (137)
    • ►  December (9)
    • ►  November (13)
    • ►  October (13)
    • ►  September (8)
    • ►  August (12)
    • ►  July (12)
    • ►  June (12)
    • ►  May (11)
    • ►  April (13)
    • ►  March (10)
    • ►  February (11)
    • ►  January (13)
  • ►  2015 (145)
    • ►  December (12)
    • ►  November (13)
    • ►  October (12)
    • ►  September (12)
    • ►  August (14)
    • ►  July (13)
    • ►  June (10)
    • ►  May (11)
    • ►  April (10)
    • ►  March (14)
    • ►  February (12)
    • ►  January (12)
  • ►  2014 (162)
    • ►  December (13)
    • ►  November (13)
    • ►  October (12)
    • ►  September (12)
    • ►  August (15)
    • ►  July (14)
    • ►  June (14)
    • ►  May (13)
    • ►  April (14)
    • ►  March (16)
    • ►  February (13)
    • ►  January (13)
  • ►  2013 (143)
    • ►  December (13)
    • ►  November (15)
    • ►  October (12)
    • ►  September (17)
    • ►  August (18)
    • ►  July (12)
    • ►  June (10)
    • ►  May (14)
    • ►  April (15)
    • ►  March (10)
    • ►  January (7)
  • ►  2012 (85)
    • ►  November (2)
    • ►  October (16)
    • ►  September (9)
    • ►  August (9)
    • ►  July (22)
    • ►  June (15)
    • ►  May (3)
    • ►  April (9)

Popular Posts

  • 10 Things Not To Bring to College
  • Fashion Friday: Plaid Meets Glam
  • Fashion Friday: White Dress
  • Top 10 Most Forgotten Dorm Room Essentials
  • The Complete College Packing Checklist

#MonogramLove

Created with by ThemeXpose